Recently, I have started to used FPGA (e.g. Zynq) to run neural-networks (NNs) defined in Caffe. My first step is performing the NN inference on FPGA. To do this and to be able to integrate the FPGA platform into Caffe, I have started to understand the Caffe C++ code and structure. Through a series of blogs, I am trying to explain my understanding using a few simple examples.
The goal of these blogs is not using the Caffe in efficient way to implement an application but get familiar with the Caffe code. Therefore, this blog is written for code developers not for application developers. In addition, I assume that reader is already familiar with the basic concepts in Caffe such as net, blob, layer and so on that can be found in its website.
In this first blog, I am going to define convolutional neural network (CNN). Although there are many books and articles explaining CNNs, their concepts and applications, here I am trying to keep everything simple just enough to be used in understanding the Caffe structure and how to add FPGA back-end for it.
Almost all articles explaining CNN start from neural-network (NN) concept, however, here I decided to start with convolution. This approach helps people who do not have background knowledge of NN start having early real experiments.
What is an image convolution?
First, what is a convolution? In general, convolution is a binary operator which combines two input functions and generates a new function highlighting a feature in one of the input function. The function whose features are going to be highlighted is called the main function and the second function is called the kernel.
In image processing, convolution is used to apply different filters on an image such as blurring, sharpen, edge detection and so on.
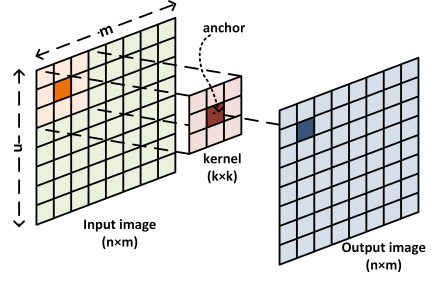
The following figure shows how to apply a kernel of size on an input image of size .
How to write a simple convolution in Caffe?
Step 00—Include required header files
[code language=”C”]
#include <caffe/caffe.hpp>
#include <opencv2/highgui/highgui.hpp>
[/code]
Step 01—Select CPU or GPU
[code language=”C”]
#ifdef CPU_ONLY
Caffe::set_mode(Caffe::CPU);
#else
Caffe::set_mode(Caffe::GPU);
#endif
[/code]
Step 02: Define a network
[code language=”C”]
shared_ptr<Net<float> > net_;
[/code]
Step 03: Load the network from a file
[code language=”C”]
net_.reset(new Net<float>(model_file, TEST));
[/code]
Step 04: assign weights for the Sobel filter
[code language=”C”]
shared_ptr<Layer<float> > conv_layer = net_->layer_by_name("conv");
float* weights = conv_layer->blobs()[0]->mutable_cpu_data();
weights[0] = -1; weights[1] = 0; weights[2] = 1;
weights[3] = -2; weights[4] = 0; weights[5] = 2;
weights[6] = -1; weights[7] = 0; weights[8] = 1;
[/code]
Step 05: read the input image
[code language=”C”]
string image_file = argv[2];
cv::Mat img = cv::imread(image_file, -1);
[/code]
Step 06: reshape the input blob to the size of the input image
[code language=”C”]
shared_ptr<Blob<float> > input_blob = net_->blob_by_name("data");
num_channels_ = input_blob->channels();
input_blob->Reshape(1, num_channels_, img.rows, img.cols);
[/code]
Step 07: reshape the whole network correspondingly
[code language=”C”]
net_->Reshape();
[/code]
Step 08: copy the input image to the network input blob
[code language=”C”]
int width = input_blob->width();
int height = input_blob->height();
float* input_data = input_blob->mutable_cpu_data();
cv::Mat channel(height, width, CV_32FC1, input_data);
img.convertTo(channel, CV_32FC1);
[/code]
Step 09: run the NN inference
[code language=”C”]
net_->Forward();
[/code]
Step 10: get the output and save in a file
[code language=”C”]
Blob<float>* output_layer = net_->output_blobs()[0];
int num_out_channels_ = output_layer->channels();
width = output_layer->width();
height = output_layer->height();
float* output_data = output_layer->mutable_cpu_data();
cv::Mat outputImage(height, width, CV_32FC1, output_data);
imwrite("outout_Image.jpg", outputImage);
[/code]
If the input image is

Then the output would be

The complete code can be found at here.
Hi Mohammad,
small blog, but interesting to catch up.